Android Data Recovery is World’s first data recovery software for Android that is designed to retrieve lost or deleted data from Android phone, Android phone’s SD card and broken Android phone.
So, below find out the complete tutorial how Android data recovery work and help to recover data from android phone and tablet, Android’s external SD card and broken Android phone.
Part 1: Android Data Recovery User Guide
Part 2: Android SD Card Data Recovery User Guide
Part 3: Broken Android Phone Data Recovery User Guide
Part 1: Android Data Recovery User Guide
Step 1: Launch Android Data Recovery Tool
Download, install and launch Android Data Recovery software on your computer and then go to Toolbox and select “Data Recovery” option.
 |
 |

Step 2: Select Android For Recovery
In a new window, you will be asked to select your Phone System. Simply click on “Android” to recover data from your phone.

Step 3: Continue To Select The Function For Recovery
In the next window, continue to select “Recover Android Data” from the available options.

Step 4: Connect Android Device To Computer
You will then be asked to connect your Android phone to computer to recover data from it. Connect your device with the help USB cable and allow the software to detect it.

Step 5: Select The File Types To Recover
In the next window, select all the file types that you want to recover from Android. Click on “Start Scan” located at the bottom right of the screen to continue.

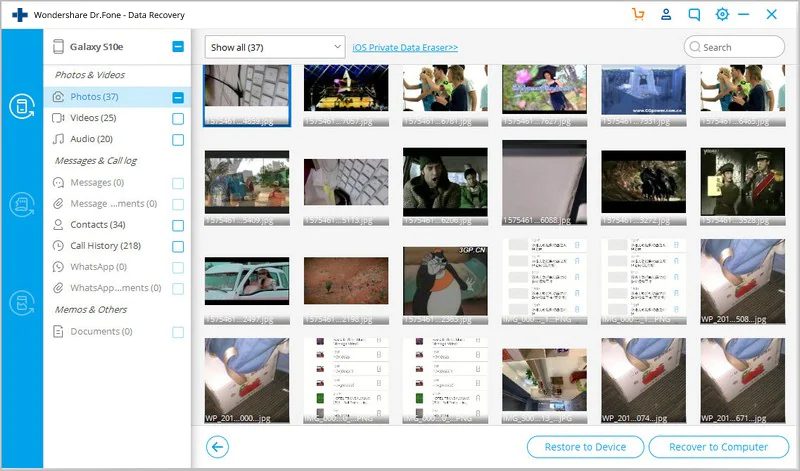
Step 6: Preview The Recovered Data
The tool starts to recover data from Android device and displays it on the preview screen. Just wait until the entire device is scanned.

Step 7: Check All The Recovered Data
Once the device appears on the screen, you can select and view the data. You can also click on the filter options located at the top. Here, you can select any suitable option to change the viewing parameters.

Step 8: Recover Data To Computer
Finally, select the data that you want to recover and click on “Recover” button. Continue to set the desired location to save the recovered data and click on “Recover” to begin the process to save files.

|
|
Part 2: Android SD Card Data Recovery – User Guide
If you are looking to restore lost or deleted data from Android SD card, then below find the step by step guide on how to recover deleted from your SD card used within the Android devices:
Step 1 – Connect SD Card Through Your Android Device or a Card Reader
Launch Android Data Recovery on your computer and select “Data Recovery” from available options. And then select the “Android SD Card Data Recovery” option.

Now connect your SD to PC. You can connect your SD card via your Android phone or by using a card reader. Select the better way for you.
Once, your SD card get detected by the software, you will see the window as shown in the image below. Select the SD card and then click on “Next” button to progress further.

Step 2 – Start Scanning Your SD Card
There are two modes available to scan Android SD card. We recommend you to choose “Standard Mode” first. If this mode doesn’t recover files that you were looking for, then you can try “Advance Mode”.

After selecting the recovery mode, click on “Next” button to start the scanning process of your SD card.
Step 3 – Preview and Recover Data From Your SD Card
Once the scanning process complete, you can now preview all recoverable files one by one. Select the data that you want back and then click on “Recover” button to save the files on your PC.

|
|
Part 3: Broken Android Phone Data Recovery – User Guide
Step 1: Connect Your Android Phone To Computer
Download, install and launch Android Data Recovery software on your computer and then click on Toolbox > “Data Recovery” option.
Click on Android on the window that pops up.
Select the option of Recover from Broken Phone to proceed.
Step 2: Select The Problem That Matches Your Phone State
You can see that there are two types of situation mentioned
- Touch doesn’t work or cannot access the phone
- Black/broken screen.
So, select the best matches situation that you have.

In the new windows, select the correct device name and model for your phone. At present this feature support for some Samsung Galaxy devices such as Galaxy S, Note and Tab series. Then click on “Next”.

Note: Make sure that you have selected the right device model for your phone. If you provide the wrong device model then it will lead to the bricking of your phone or any other problems.
After you are sure that you have selected the right device model for your phone, then type in “Confirm” and click on “Confirm” button to proceed further.

Step 3: Enter Into Download Mode On The Android Device
Enter into Download Mode on your Android phone by simply following the instructions shown on the program.
- Turn OFF the phone.
- Press and hold “Volume Down” + “Home” + “Power” button together on the phone.
- Press “Volume Up” button to enter into Download Mode.

Step 4: Analyzing Android Phone
Once your phone enters into download mode, the software will start to analyse the phone and will download the recovery package.

Step 5: Preview And Recover Data From Broken Android Phone
Once the analyzing and scanning process completes, Android Data Recovery will show all the file types by categories. After this you can preview the recoverable files types within preview screen of the program. Select the files that you want back and then click on Restore to Device or Recover to Computer to recover data from broken Android phone.
|
|