Learn 4 Methods To Backup And Restore Data (Photos, Videos, Contacts, Messages, Apps, etc) Of Your Samsung Galaxy Note 9!
Overview: Purchased or got a new Samsung Galaxy Note 9? Looking for an easy method to backup Galaxy Note 9 Data so that you can restore them back at the time of unexpected data loss situation? Just Relax! In this post, I am going to provide four methods that will help you to back up and restore data on your Samsung Galaxy Note 9.
- Method 1: Use Samsung’s Own Smart Switch To Backup & Restore Samsung Galaxy Note 9
- Method 2: Backup & Restore Samsung Galaxy Note 9 Data To Google Drive (Photos/Videos/Files)
- Method 3: Backup And Restore Galaxy Note 9 Data Via Google Account
- Method 4: Use Android Data Backup & Restore To Backup And Restore Samsung Galaxy Note 9
- Bonus Tip: What If You Don’t Have Backup of Your Galaxy Note 9 Data
With the help of Android Data and Backup software, you can:
- Easily backup all data of Galaxy Note 9 to PC and later you can easily restore them back within few mouse clicks.
- Backup & Restore files such as Photos, Contacts, Messages, Call history, Gallery, Video, Calendar, Audio, Apps, Apps data (for rooted devices) and many more.
- Also backup data from broken, screen damaged/ smashed/crashed, water damaged, locked Samsung Galaxy Note 9, if USB debug is already enabled.
- 100% read-only program. Safe, secure and easy to operate.
Free Download/Buy Now Samsung Galaxy Note 9 Data Backup And Restore Tool By Clicking on Button Below!
 |
 |
Excited to use new Samsung Galaxy Note 9? Wait a moment! Before you use your new Galaxy Note 9 data, you must know about backing up and restoring your important or precious data of your Galaxy Note 9.
But why we need to backup Samsung Galaxy Note 9 Data?
The short answer is – we should regularly backup our Galaxy note data, so that we can easily restore the data from the backup in case/scenarios of unexpected or unknown loss or deletion of data.
Beside that if you are replacing your old Android phone or Galaxy Note 5/6/7/8 to Samsung Galaxy Note 9, even then also you backup comes very useful to transfer data from old Android to Samsung Galaxy Note 9.
Alright so now let us learn those 4 methods to backup and restore Samsung Galaxy Note 9 data.
Also Read: Top 4 Ways To Backup and Restore Samsung Galaxy S9/S9+
Method 1: Use Samsung’s Own Smart Switch To Backup & Restore Samsung Galaxy Note 9
Smart Switch is Samsung official software that is designed to backup and restore Samsung phone data.
With the use of Smart Switch, you can backup following file types: photos, videos, music, contacts, messages, call logs, notes, voice memos, reminders, soundcamp, documents, emails, home screen settings, applications and complete settings of the phone.
Note: In this tutorial, I have used Galaxy Note 8 to show you the detailed steps on how to backup and restore data with Smart Switch. And the same tutorial should work fine for the Galaxy Note 9.
Below follow the tutorial to backup Samsung Galaxy Note 9 data using Smart Switch.
Smart Switch: Backup Samsung Galaxy Note 9 Data
Step 1: First, install Samsung Smart Switch and launch it on your computer.
Step 2: Now connect your Galaxy Note 9 to your computer. If phone asks any permission then simply allow it.
Step 3: You will then see, your phone showing a Smart Switch screen.
Step 4: Now on your computer in the Smart Switch, click on the small “Setting gear icon” and then click on “Preference”.

Step 5: Select the backup folder location, in the preference.
Step 6: Click on “Backup Item” tab and then select the file types that you want to backup. It is suggested that you must select all file types.
Step 7: After selecting all the file types, click on “Ok” button and then go back to Smart Switch’s home screen.

Step 8: Now click on Backup button and allow the Smart Switch to back up your phone data to computer.

Step 9: You can see that Smart Switch is backing up your Galaxy Note 9 Data.

That’s All! After the completion of backup process, you will now have backup files of your Samsung Galaxy Note 9 on your computer.
To view details of backed-up files, go to Preferences > and then click on Details. You can now see the details of the backup files. You can also click on View Folder option to view the backup folder.

Next, learn the steps to restore Samsung Galaxy Note 9 data using Smart Switch.
Smart Switch: Restore Samsung Galaxy Note 9 Data
Note: You can only restore data if you have already backed-up your Galaxy Note 9 data with Smart Switch.
Here follow the steps:
Step 1: Connect your Samsung Galaxy Note 9 to computer and then launch Smart Switch on your computer.
Step 2: In the Smart Switch, just click on “Restore” button and the software will start restoring all the data.

That’s very simple!
Also Read: Backup And Restore Google Pixel/Pixel XL/Pixel 2/Pixel 2 XL
Method 2: Backup & Restore Samsung Galaxy Note 9 Data To Google Drive (Photos/Videos/Files)
You can use Google Drive to back up your Android phone data, including your Galaxy Note 9 data as well.
This will help you to backup all your photos, videos, music and documents files.
Note: This method will not backup contents such as text messages, contacts (contacts can be synced to Gmail account separately), WhatsApp and other apps data.
Here follow the steps to backup Samsung Note data to Google drive.
Steps To Backup Samsung Galaxy Note 9 Data To Google Drive
Step 1: First of all install Google Drive app on your device.
Step 2: Open the app and login with your Google account.
Step 3: Select the files that you want to backup to Google Drive.
Step 4: Finally sync the device and now all the selected files will get saved to Google drive.
That’s all!
Steps To Restore Samsung Galaxy Note 9 Data From Google Drive
Now in order to restore the backed-up photos, videos, music or documents from Google drive, simply follow the below steps:
Step 1: Open Google Drive app or login to Google drive webpage. Note: Login with the same Gmail ID that you have used to backup your files.
Step 2: Once you logged-in, you will see your backed up pictures, videos, documents. You can now now download the files from there. It’s easy and simple.

Also Read: How To Backup And Restore Motorola Phone
Method 3: Backup And Restore Galaxy Note 9 Data Via Google Account
If you want to backup your Galaxy Note 9 to Google account, then here follow the steps to backup Galaxy Note 9 to Google account. Additionally, this is very best option to backup Galaxy Note 9 data without PC.
Steps To Backup Galaxy Note 9 To Google Account
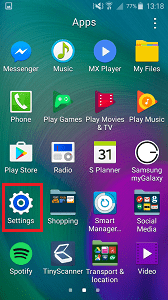
Step 1: On your Galaxy Note 9 go to Settings.

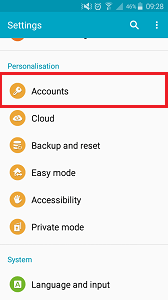
Step 2: Scroll down and tap on “Accounts” under “Personalisation” section.

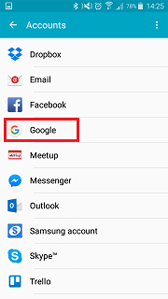
Step 3: Tap Google.

Step 4: Tap on your email address.

Step 5: Now you can see the list of file types that you can backup to your Google account. Check mark the boxes alongside for data that you want to backup.

Step 6: Tap “three dots” or “More” located at the top right corner of the screen.

Step 7: Tap on “Sync Now”.

Next, let us learn the steps to restore Galaxy Note 9 backed up data to another Android phone from Google account.
Steps To Restore Samsung Galaxy Note 9 From Google Account Backup
It is very simple to restore backed-up device data & settings to another Android phone or Galaxy Note 9.
Here follow the steps:
Steps 1: Your new Galaxy Note 9 phone will ask you to enter email ID to set-up your device.
Steps 2: So, when you add your Gmail ID (enter the same Gmail ID that you have used to backup your phone to Google Account), then all data and settings gets restored on your new device.
Note: You can’t restore a backup from a phone running on higher version to phone running on low version.
If you want to restore backed-up data from Google account to another Galaxy Note and not new phone, then follow the below steps:
- Go to Settings on your phone in which you want to restore from a backup.
- Tap on “Users & account” and then add account.
- Thereafter follow the onscreen steps.
Also Read: LG Phone Backup And Restore: Secure Your Important Data To PC
Method 4: Use Android Data Backup & Restore To Backup And Restore Samsung Galaxy Note 9
Android Data Backup & Restore is handy and most popular Samsung Galaxy Note 9 Backup & Restore software that can successfully backup your data and restore the backed-up files for Galaxy Note 9 without deleting or overwriting the existing data.
With the help of this backup and restore program, you can backup photos, videos, audio, contacts, text SMS, call history, WhatsApp chats, gallery, calendar, notes, voice memos, documents, etc to computer. And later you can easily restore them back on Galaxy Note 9 or any Android phone or tablet.
The best part about this Data Backup and Restore Tool for Galaxy Note 9 is that it allows your backup all data without Google Account and Smart Switch. Additionally, it supports more than 8000+ Android phone, including all Samsung Galaxy Note Series such as Samsung Galaxy Note 9/8/7/6/6 Edge/5/4/3/2 running on Android Oreo, Nougat, Marshmallow, KitKat, Lollipop and former OS versions
Here free download trial version/buy now Samsung Galaxy Note 9 Backup & Restore Tool.
 |
 |
Below follow complete tutorial on how to backup Galaxy Note 9 to PC by using Android data backup and restore tool.
You May Also Like:
- How To Recover Deleted or Lost WhatsApp Messages On Samsung
- How To Transfer Contacts From Samsung To Xiaomi
- Transfer/Backup/Copy Contacts From Samsung Phone To PC
- Learn To Fix SD Card Keeps Disappearing On Android
Steps To Backup Samsung Galaxy Note 9 Data To PC By Using Android Data Backup & Restore Tool
Step 1: Connect Your Android Phone To PC
First, download, install and launch Android Data Backup & Restore on your PC and select the option Backup & Restore.

After this connect your Android phone to your PC with the help of USB cable. Make sure USB debugging mode is enabled on your phone. If your Android OS is 4.2.2 or above, then you will get pop-up message on your Android phone that will ask you to allow USB Debugging, simply tap on OK.

Once, your phone get connected, you can then click on Backup to begin the backup Android phone data.
If you have used this tool in the past for backing up your device, then you can also view your past backup by clicking on “View backup history”.
Step 2: Select The File Types To Backup
Now select the file types (photos, videos, contacts, call history, messages, calendar, gallery, audio, applications, app data) that you want to backup. By default the program checked all the file types. After this click on Backup to that the backup process.

Just be patient because backup process will take few minutes of time. So, don’t disconnect your Android phone and even don’t use your device during the backup process.

Once, the backup is completed, you can then click on “View the Backup” to see what’s in the backup file.

Once, you successfully backed-up all data of Galaxy Note 9, you can then below follow steps to restore data from the backed-up files using this tool.
Steps To Restore Samsung Galaxy Note 9 Backed-Up Data From PC
Step 1: Connect Your Android Phone to PC
Launch Android Data Backup & Restore and select “Backup & Restore” option. After this connect your Android phone to computer with the help of USB cable.

Step 2: Select The Backup Files That You Like To Restore
After clicking on Restore button, the software will display all the Android backup files on this computer. Select the backup file that you want and then click on View next to it.

Step 3: Preview and Restore The Backup Files to Android Phone
Here you will be able to see the preview of each file in the backup. Now select the file that you need and click on Restore button to restore them to your Android phone.

The complete process just takes few minutes of time. During the restore process, please do not disconnect your Android phone and even do not use your Android device.

 |
 |
Also Read: How To Backup Xiaomi Mi and Redmi Phone Data And Restore Them Back
Bonus Tip: What If You Don’t Have Backup of Your Galaxy Note 9 Data
What if you have accidentally deleted or lost your important or precious photos, videos, contacts, WhatsApp conversations, text messages, call logs, voice recordings, notes, voice memos, calendar, etc on your Samsung Galaxy Note 9 and you don’t have backup?
Well, in such situation you don’t need to get panic. Simply stop using your phone and immediately use Android Data Recovery which is perfect Samsung Galaxy Note 9 Data Recovery Software. It will help you to recover lost or deleted data from your Galaxy Note 9 without backup.
Here follow the steps to recover deleted data from Galaxy Note 9.
Wrap Up
So guys, those are the top four methods to backup and restore data of your Samsung Galaxy Note 9. It is highly recommended that you must always backup your important and sensitive information of your Galaxy Note 9 data to handle unexpected data loss or when you replace your old Android phone to Galaxy Note 9 to transfer data.
However, if you do not have backup, then don’t forget to use Android Data Recovery software to recover deleted or lost data from Samsung Galaxy Note 9 without any backup.
Please support us by subscribing to our YouTube Channel.

Max Field is a founder of Recover Android Data. He is an Android lover and loves to write tips, tricks, fixes for errors, data recovery solutions and more related to Android. Provide Gaming Tips, Tricks, Game Error/Issues Solutions (PC/Xbox/PlayStation/Mobile). He has 11+ years of experience in this field.


